|
| |
|
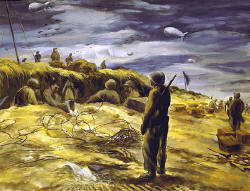
(Photo credit: Heavies on Their Way Home After Raid on
France, Alexander P. Russo #37, Gouache, 1944. Source is Navy Historical
Center) |
Starting with the Navy Historical Center's Online Gallery, you will research D-Day using web resources. Based on your research, you will invent a
fictional character and place him or her at a D-Day battle, creating a
record that explains the character's actions and reactions.To create your historic record, you must first research and then write
your project:
Step 1 - RESEARCH:
- Use the D-Day Webquest
worksheet to
help you prepare, research, and organize your project. This is a
word-processing document that you can copy to your laptop and then fill-it
out on the computer as you work.
- Visit the Navy Historical Center's D-Day page (see
resources) to view the works of the Navy
artists. Spend time
viewing the many pages and reading the descriptions that
go with them.
- Choose one of the drawings to base your narrative upon. Record
your choice on your worksheet. Examine the
details of the drawing and the emotions it represents. What is happening
in the picture? Who is in the picture? Try to imagine what is going on in
the mind of someone in the picture, or someone who is seeing the events of
the picture unfold live.
- Do further research to
help decide the details of your character and what battle you will
describe. Start your research by visiting the sites on the
Resources page. Your
choices for the battle are the five landing beaches (Omaha, Sword, Juno, Utah, or Gold),
Pointe du Hoc, the Orne River, or the Cotentin Peninsula). Use your
worksheet to record your decisions.
- Find
first-hand accounts. In addition to the web sites listed on the
Resources Page,
search the web for personal accounts of D-Day by someone with a
similar occupation or background as your character. If you know of any
veterans of WWII invasions, interview them for their unique perspective.
Try to use elements of these recollections to add detail to your own
narrative.
Step 2 - WRITE:
- Plan what you will write. Remember that order and organization
are important when creating your record.
- Write your rough draft. Make your narrative evocative
of the event by using strong verbs and powerful descriptions that
involve all of your senses. Remember to personalize the events, showing the
inner thoughts, fears, and hopes of your character.
- Proofread and revise as needed. Spelling counts!
Even if you have created a character who is uneducated, proper spelling and
grammar is required.
- Create a cover page which has your
inspiration picture and your name. Below the picture should be the name of
the picture and the name of the artist. Include on the cover page a short
description and web address of the first-person narrative(s) you
researched for this project. If you did a personal interview with a veteran, provide a name
and brief history.
- Verify you've included everything required in the
project - refer to your worksheet.
- Turn in your first draft
by the due date.
- Revise again - Make changes as required by the
teacher.
- Turn in your project by the due date to your teacher,
either by submitting it via dropbox or email, or turn in your project by
hand.
Presentation
in addition to handing in your project, you
must also give a presentation about your project to the class. The
presentation should last two to five minutes, explaining about your
character and/or the record you created. You may also discuss what you knew about
WWII and D-Day before the websearch, and what you know now, or share
interesting information you learned during your Webquest. You can do this as a speech, a
slide show, an animoto, a poster talk, a rap song, a dance, a display of sketches ...
whatever you are most comfortable with. You may work with a partner to
do your presentation. |
|
